
This post comes courtesy of Matt Kuzdub. Matt’s best known for creating www.mattspoint.com – an online platform for all things tennis training – including coaching, articles and ebooks. He also coaches a small group of elite players (college & pro), both on and off the tennis court. Previously, Matt was the lead sport scientist at ‘Train with PUSH’ and holds an MSc in Strength & Conditioning from the University of Edinburgh.
…
Technology has changed. Today, we can do a lot more, with a lot less. But this can also deter us from spending time watching our athletes move. And in particular, watching them perform their sport – whether in practice or competition.
Some coaches have even become ‘over-reliant’ on technology. And I tend to agree with the sentiments expressed by coach Pfaff and McMillan:
“Whether it is VBT, Dartfish, HMV, GPS, or any other of the host of new wearables that are flooding the market each week, we are continually being sold technological ‘upgrades’ that will supposedly make our coaching easier and more effective. But in so doing, is it negatively affecting our actual ability to coach?”
That’s where my problem began. I found myself spending a lot of time on things that, truthfully, probably weren’t that important in the grand scheme of things.
Now, before I continue, you should probably know this – for lack of a better title, I’m what many in our field now call a performance coach. I work in tennis and help players with a variety of performance related factors, including the technical and physical components of the game. Which, at times, can make things a bit overwhelming.
Where should I direct my focus? What do my athletes really need from me?
I know many coaches ask themselves similar questions – especially in sports like track. You’re a one (wo)man show with a budget the size of a 7 year old’s piggy bank. But based on the work by prominent coaches like Pfaff, Bondarchuk and others – the time an athlete spends actually practicing their sport (i.e. first generational tasks) trumps all.
And while there’s no question that performance factors like strength and power are important, they act a supporting role.
So when I came across the ALTIS Kinogram Method, I was intrigued. Here’s a really cost-effective way I can analyze tennis stroke mechanics with my athletes. Because ultimately, striking a tennis ball ranks pretty high on the priority list.
In this article, I’ll share how I use kinograms in my own setting to affect technical changes. While I have not mastered the methods employed by ALTIS; my hope is that some of these insights can provide coaches with additional proof that kinograms can be used in settings outside of track.
Note – for details on what a kinogram is, how to develop your own (and other details), I encourage you to check out this free ebook – The ALTIS Kinogram Method.
The Shot Cycle in Tennis
To better understand how we use the kinogram method in our setting, we must lay some groundwork. From the moment a player makes contact with the ball, until the moment that ball is coming back towards them, there’s a series of events that occur – called the shot cycle.
The shot cycle has a profound impact on the striking action in tennis, and thus, the technical execution of a player’s swing.
I will present the shot cycle from the perspective of one player hitting a groundstroke from the baseline – either forehand (FH) or backhand (BH) – from the moment they react to the oncoming ball, to the moment they are in a ready position to receive the subsequent shot:
- Player begins in what’s called ‘the ready position’ (i.e. waiting and analyzing cues from the other side of the court).
- Player initiates what’s called ‘the split-step’ action (a small hop/jump). This allows them to utilize the SSC (stretch-shortening cycle) to better propel them towards the direction of the oncoming ball.
- While in the air, the player is taking in information from the opposing side of the court (i.e. how did my opponent prepare their racquet, where is he/she standing etc).
- Using perception skills (anticipation, visual scanning etc.), the player, after landing from the split-step, initiates their first step towards the oncoming ball.
- While moving towards the ball, the player begins the ‘preparation phase’ of their stroke.
- Prior to striking the ball, the player decelerates into their ‘set-up’ position.
- Once set, the player swings their racquet to strike the ball.
- After the strike, the player performs a ‘recovery’ actionto get back into a more ideal position to receive the next shot.
- The player is back in the ‘ready position’.
The above outline is a ‘framework’. The details of every shot, every scenario, will surely differ. But this cycle, on almost all shots (except for serve scenarios), remains.
The Importance of the Shot Cycle – An Example
We cannot analyze tennis strokes in isolation. We must take into account many factors like the phase of play (offense, defense, neutral), the positioning of the opposing player, their gamestyle, strategy, strengths, weaknesses and so on.
Not only that, the way a player interacts with the oncoming ball – i.e. movement, racquet prep, timing etc. – will have a big impact on stroke mechanics.
For instance, we often encourage players to ‘beat the ball to the bounce’. In other words, I want players to be set with their loading leg (rear-leg on the FH side for example) before the ball bounces on their side of the court.
This is a lot easier said than done! If the ball is hit into the opposite side of the court, with a lot of pace, getting to it before the bounce is a challenge. What we do notice, however, is that stroke mechanics are much better when players get to the ball before the bounce – they simply have more time to work with.
One side note – with pro players, we’ve noticed that it can be a real challenge to get to the ball before the bounce because of the extremely high pressure/time constraints that are seen at the highest levels of the game. But that doesn’t stop us from having that aim in mind during practices (and even in matches). This cue can therefore act as a task constraint. And oftentimes, with elite players, this can be enough to push their movement abilities, heighten their perceptual awareness and consequently, get them into better positions prior to and during, striking actions.
In any case, knowing the shot cycle provides a framework for how we analyze groundstrokes in tennis. Because the sport is so open, if we don’t perform a split-step at the right moment (yes, there is a very real ‘timing’ component to this), we might make contact with the ball late, which could not only affect the stroke, it could very well have a negative impact on the quality of the shot.
The Stroke Cycle (plus how I use the Kinogram Method)
Prior to reading about the ALTIS kinogram method, I was already accustomed to using screenshots with fellow coaches and athletes. The way I’d do is that I’d often share one single screenshot, depicting one single posture or position.
But there’s an obvious issue with my ‘old’ method. What the athlete does leading up to that position, has a lot to do with the position in question. Perhaps their technique at impact was poor because they used the wrong stance for that particular shot and situation? Or because their elbow (and consequently racquet head) dropped too early, causing a steep, upward finish.
Seeing the entire picture – literally – is important.
On top of that, while it can be valuable to compare a player’s mechanics by using other players (inter-player analysis), I believe it’s even more valuable to compare the same player over time (intra-player analysis).
In tennis, there’s no shortage of opportunities to do some inter-player comparisons.
Now, before we get into a practical example, let’s tackle the stroke cycle in tennis, using the forehand as our example.
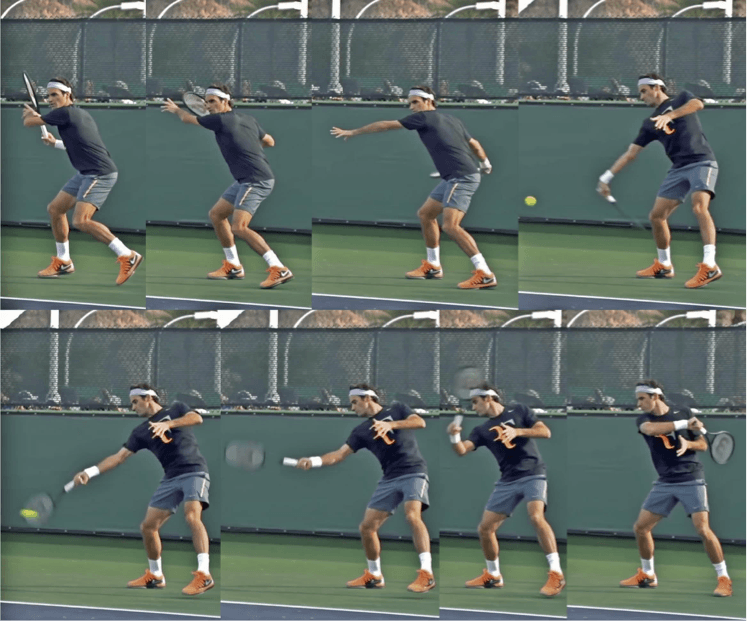
For simplicity – and a quick way to determine key positions – we use 4 landmark positions during groundstrokes to analyze technique. We will look at each below, adding clarity along the way.
Please note two items:
- We won’t do an in-depth analysis of stroke mechanics as it is beyond the scope of this article.
- We use kinograms to analyze other strokes as well, including the serve, return, volleys etc. and even specific tactical scenarios of each stroke.
1 – Set-Up
This is the moment in the stroke cycle where the player has performed what we call a ‘unit turn’ (i.e. upper-body rotates/turns) – which helps to facilitate racquet prep. We’re also looking at the relative separation between the hip and shoulder axis. With the lower-body, the athlete assumes a stance – which varies depending on the phase of play, positioning on the court and a host of other factors. So we’re also looking at various features of the stance.
2 – Acceleration
This is the phase of the swing where the athlete begins to uncoil; with the end goal of having adequate racquet head speed when making contact with the ball. For most strokes, we are checking for a specific sequence here – i.e. hip initiates, followed by trunk, followed by arm, followed by racquet. The segmentation is subtle which is why having still frames can be valuable here.
3 – Impact Point
At this moment in the stroke cycle, the player’s racquet (stringbed to be exact) meets the ball. It’s a critical landmark because it tells us a lot about a player’s preparation, timing and what type of shot they’ll end up hitting. The ideal model would have the athlete with a straight-arm at impact (although only 2 players in the history of tennis have achieved this position on the forehand – Federer and Nadal – which, arguably, are the 2 best forehands we’ve ever seen). Other things to look at here include horizontal and lateral distance of the impact relative to the torso, rotation of the hip and trunk (are they too open, too closed etc), body lean and tension (particularly in the shoulders, hitting arm and neck/face).
4 – Deceleration (aka follow-through)
Too often, we see coaches harping on the follow-through but truthfully, it’s a function of tactics and the movements of the player’s swing, leading up to the finish. If a player wants to add height to the ball, their follow-through will most likely end up higher. If a player wants to hit a low passing shot while his/her opponent is at net, they’ll likely finish the stroke closer to their opposing hip.
For us, we’ll take a screenshot earlier during the deceleration phase – not far after contact with the ball, just prior to whipping the racquet around. It acts as an ‘indicator’ phase and helps us determine whether the impact point was optimal, that the player had enough racquet speed through the accel phase and will provide additional info on the sequencing of the stroke, with respect to our model.
Some Examples and Analyses
I’m going to present 3 kinograms below. It’s the same athlete, on 3 different occasions. Continuing with our theme of using the forehand as our compass, we’ll go through this player’s forehand. I’ll describe what I observed (and what the athlete and I mutually agreed on was important to address), the intervention we took to address it and a look at the resultant outcome.
Sequence 1 – Observation
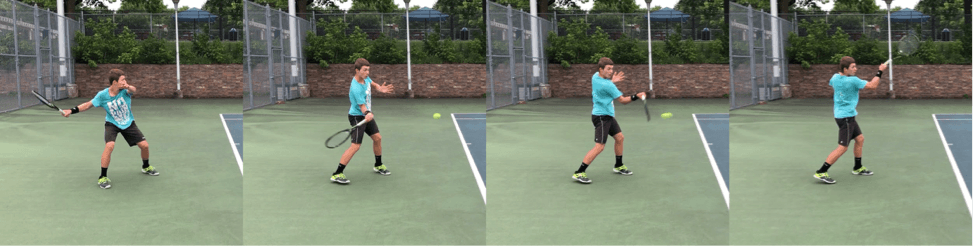
Set-up – This looks quite solid overall – the base is sufficiently wide, adequate racquet/shoulder/elbow prep and spacing. From this angle, it’s hard to tell if we’re getting enough dissociation between the shoulder axis and hip axis (mediolaterally). It seems like the athlete could have a slightly larger shoulder turn (but we would probably need to see that from the another view – i.e. Federer from above).
Acceleration – During this phase, it seems like the athlete didn’t quite rotate the hip optimally (as you’ll see below, indications of a properly initiated and segmented hip thrust see the rear-leg heel come off at this point in the swing and the rear-knee collapse forward). If the hip lags, the player relies on the upper-body to generate racquet head speed – which is not ideal.
Impact Point – The athlete looks like he’s meeting the ball ‘late’ compared to our ideal model. The elbow is too close to the torso and too bent overall. We also see some tension in the face and shoulders (they are rising) – not knowing tennis at all, you would probably still conclude that this isn’t the most ideal biomechanical position from both a performance and injury risk perspective.
Follow-Through/Decel – After contact, we see even more tension (face, shoulders, forearm, wrist) and because the athlete was late on their impact, to ‘save’ the shot, he has to lift upwards (otherwise, the ball would likely go into the net). The elbow remains bent which means we’re not utilizing much of the forearm/wrist segment to generate added pace and rotation on the ball. This adds to our hypothesis – i.e. ‘the player might have been late at impact’.
Given this, do we know the main problem yet? We could simply tell the player to rotate more with the rear-hip and make contact earlier. Or to stay more relaxed through contact. But would those suggestions be helpful?
This is where the shot cycle comes into play…
Another view
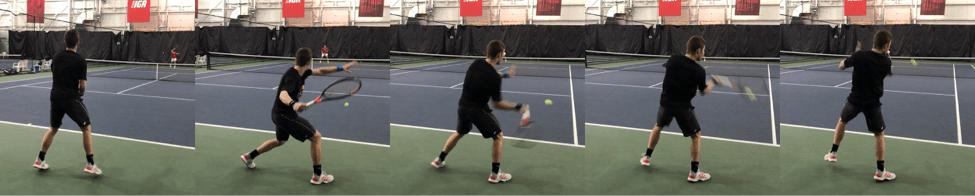
We won’t go into super detail here but take a look at a couple key positions. First, as we can see in frame 1, the athlete is at the peak of his split-jump height after his opponent has made contact with the ball (he should be at this position either at opponent’s contact with the ball or before it). So movement wise, his timing is already a touch late.
This seems to contribute to a late set-up as seen in frame 2 (he’s set with his rear-leg after the ball has hit the ground…whereas it should be on or before the bounce, as we indicated above).
This sequence cascades further down the chain – not able to use his hip efficiently (frame 3), making contact late (frame 4), momentum coming up instead of forward (frame 5).
This had been a common trend for this athlete. And after showing this to him, we both knew he needed to be earlier with his split-step, more perceptually ‘present’ and more urgent with his set-up.
All of this did help, to a degree. But because he was so accustomed to this movement sequence, he couldn’t quite feel the ball ‘earlier’. So we needed to intervene.
Here’s what we did…
Sequence 2 – Intervention
We went back to the basics. I’m only showing one kinogram here but the progression we took is as follows:
- Self-fed forehand
- Coach hand-fed forehand (close up)
- Coach racquet-fed forehand (from the other side of the court)
- Back to rallying
Even though this athlete is one of the top ranked players in Canada and has an ATP ranking, he needed to ‘feel’ what we were after in a very rudimentary way. And do you notice the difference compared to the previous kinograms? Look at the hip, toe and knee (remember, they are indicators of proper hip rotation & sequencing) in frame 2. Look at how far in front he’s hitting relative to his torso (and how the elbow bend has gotten more obtuse) in frame 3. And the extension of the arm (almost looks like he’s reaching forward) in frame 4 – which is a result of all the previous sequences in conjunction with one another.
We used this drill, along with some simple cues, to help this player get to where we wanted him. But the true test is this, can you do it in an open setting – i.e. a rally at full pace?
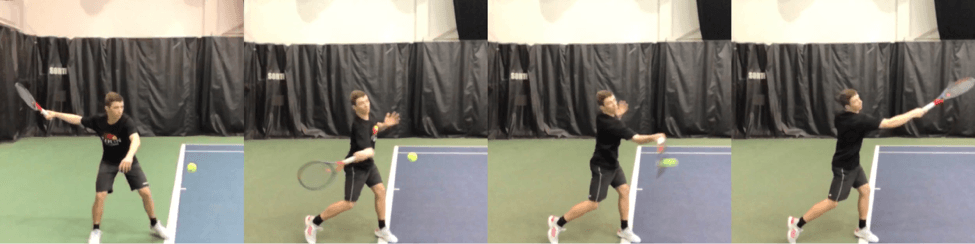
Sequence 3 – Outcome
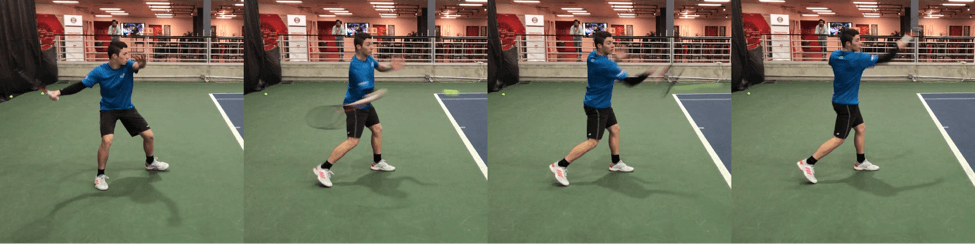
Set-up – Again, base is solid and it looks like we have a bit more separation between the shoulder and hip axis (perhaps because he was set earlier…which gives him more time to get the upper-body into better positions during the prep phase).
Acceleration – We can see that the hip has opened up a lot sooner and the trunk hasn’t fully rotated (we want it to, but if we open the upper-body up too soon, we’ll lose our positions which leads to loss of power and control).
Impact Point – This is our key performance indicator for this particular stroke and athlete. Notice how much more in front he is with the impact compared to our initial observation. The elbow is still slightly bent but we can see the momentum is more linear. We may never get to the self-fed stage with this player but this is a more optimal position overall.
Follow-Through/Decel – Here, the athlete’s arm/racquet is traveling more linear at first, and then up – rather than just up like we saw in the first sequence. But more importantly, notice how little tension there is in the swing. From a long-term injury perspective, this is ideal. The posterior shoulder muscles, lats and back muscles are all helping to decelerate the arm/racquet….because he’s hitting earlier and able to finish the swing with proper rotation. Whereas previously, the swing was abbreviated (likely adding more stress to smaller muscles that can’t take that kind of repetitive loading).
Final Thoughts
Pro tennis is faster than it’s ever been. Average forehand speeds are often in the high 80s, low 90s (mph), with some players being able to hit over 100mph on attacking shots.
One of the main findings pre and post our intervention was this player’s ball speed. Previously, he was hitting his forehand in the low 80s and would max out around 86mph. Now, he’s able to hit consistently in the mid to high 80s and can get into the mid 90s when he really opens it up. We still need time to improve, well, timing, rhythm and repeatability, but this was a change that needed to happen.
But imagine we saw the speed values for his forehand without looking at his stroke in detail. We might just assume that he needs to get stronger or improve some other physical performance factor. And perhaps there’s some truth in that. However, this seemingly small technical change, we believe, will not only improve performance, will lead to less stress on the athlete’s playing arm.
While my process isn’t perfect, the primary benefit has been the impact kinograms have had with athletes. It’s no surprise that they love videos – both real-time and slo-mo – but for technical analyses, they have bought into the value of these sequences.
They’ve also made me ask the question – “is this aberration something we should change, or is it too ingrained for us to take on?”. Having the kinogram and actually being able to see ‘how far off the ideal model’ we are, can help determine how drastic our intervention needs to be. If we’re falling within a certain acceptable bandwidth, then smaller changes over time will help on many fronts (including less time away from competition).
This post isn’t meant to shame technology in sport and the advances we’ve made. Rather, it’s meant to provide coaches with an alternative option. And not just sport coaches but S&C coaches alike. Having a greater understanding of key landmarks for each sport, position, situation and so on, can also have a profound effect on how we prepare physical programs for our athletes.
Lastly, my fascination with tennis – and movement – began years ago. I had an early subscription to the TENNIS magazine, where every issue showcased a photo sequence of a particular player/stroke. Whether it was Sampras’ running forehand or Steffi Graf’s slice backhand, as a young teen aiming to improve my game, I’d attempt to copy these stars.
Which brings me to my final point – photo sequences in sport have been around for ages. So perhaps the future of technology might just be in the past…and the kinogram is leading the way.
Thanks again to Matt for putting this post together! Check out more of his work at www.mattspoint.com and give him a follow on Instagram at @mattspoint_tennis.
")